About Me

Contact Me

Wednesday, April 11
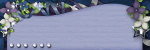
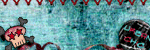
 Tag/Tut I made using just my NEW kit, "Stagecoach"
I have made a tutorial using my "Stagecoach" kit. I am not a tutorial writer, but I thought I would try to write another one. I love being able to use a kit and not having to look for a tube to match sometimes. This tut is perfect for that. If you would like this kit, it is in all my stores now. It is also on sale for less than $3.00. Feel free to share your results with me if you follow my tut. I would LOVE to see and share it here. Thanks for looking!

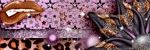
"Stagecoach"
1. Paint Shop Pro (I am working in version 12). You will need some knowledge of PSP.
2. Stagecoach scrapkit by Kim's Korner. You can get it at any of my stores. Just click any of the links to the right to go to my stores.
→CLICK HERE to go to Divine Intentionz and download this template .
Be sure to leave Missy some love in her chat box if you download. ;)
*Save your work often
-Open missy_tagtemplate418. Click window-duplicate. Now close the original.
-click copyright layer in your layer pallete and hide layer.
-Now let's color our template!
-
-Open Papers 03, 07, 08, 10, & 15. I duplicate each paper and close the originals first. To do this just click windows-duplicate.
-Resize Paper 03 to 400 x 400 pixels (or resize by 50%) Copy Paper 03. Now, go to your Template. In your layers pallete, click on circle left to highlight it. Click selections, float, defloat, paste in selection. Add drop shadow (I used 2, -1, blur:5; color- white) Copy paper 03 again. Go back to your template in your layers pallete, click on circle right to highlight it. Click selections, float, defloat, paste in selection. Add drop shadow (I used -1, 2, blur:5; color- white) Now you can close Paper 03. *Remember if you did not duplicate it you will have to click no to save when the box pops up.
-DON'T FORGET TO SAVE OFTEN!
-Resize Paper 10 to 400 x 400 pixels (or resize by 50%) Copy Paper 10. Now, go to your template. In your layers pallete, click on square2 right to highlight it. Click selections, float, defloat, paste in selection. Add drop shadow (I used-1, 1, blur:5; color- black)
Go back to your Template In your layers pallete, click on square 2 left to highlight it. Click selections, float, defloat, paste in selection. Add drop shadow (I used 1, -1, blur:5; color- black) Keep Paper 10 opened. We are going to use it again.
-DON'T FORGET TO SAVE OFTEN!
-Resize Paper 07 to 400 x 400 pixels (or resize by 50%) Copy Paper 07. Now, go to your template. In your layers pallete, click on square center to highlight it. Click selections, float, defloat, paste in selection. (I used 2, -2, blur:5; color- black) Keep Paper 07 open.
-Copy Paper 07 again. Now, go to your template. In your layers pallete, click on rectangle to highlight it. Click selections, float, defloat, paste in selection. Keep Paper 07 open.
-Resize Paper 08 to 400 x 400 pixels (or resize by 50%) Copy Paper 08. Now, go to your Template. In your layers pallete, click on square left to highlight it. Click selections, float, defloat, paste in selection. Go back to your Template In your layers pallete, click on square right to highlight it. Click selections, float, defloat, paste in selection. Now you can close Paper 08. *Remember if you did not duplicate it earlier you will have to click no to save when the box pops up.
-Copy paper 10 again. Now, go to your Template. In your layers pallete, click on thin rectangle 1 to highlight it. Click selections, float, defloat, paste in selection. Copy paper 10 one more time. Go back to your Template In your layers pallete, click on thin rectangle 2 to highlight it. Click selections, float, defloat, paste in selection. Now you can close Paper 10. *Remember if you did not duplicate it earlier you will have to click no to save when the box pops up.
-Resize Paper 15 to 400 x 400 pixels (or resize by 50%) Copy Paper 15. Now, go to your template. In your layers pallete, click on diamond to highlight it. Click selections, float, defloat, paste in selection. (I used 2, -2, blur:5; color- black) Now you can close Paper 15. *Remember if you did not duplicate it earlier you will have to click no to save when the box pops up.
-DON'T FORGET TO SAVE OFTEN!
Now your template is colored. Let's add some elements. (You can do your own thing at this point. You don't have to use the same elements. Put your own flair on your tag. If you choose to use a tube, please use all the correct credits on your finished tag.
-paste stage on top layer. resize 50%. erase bottom portion of stage. Make sure you are careful when erasing so you don't leave any eraser marks that can be seen.
-paste glass rack - resize 50% - add dropshadow. (I used 2, -2, blur:5; color- dark gray)
-paste bar - resize 50% - add dropshadow. (I used 2, -2, blur:5; color- dark gray)
-DON'T FORGET TO SAVE OFTEN!
-post speaker. resize 50% - resize 80%. move to layer below bar. Dupilcate, mirror.
-paste table - resize 50%
-paste chair - resize 50%
-paste cocktail shaker - resize 60% 3 times
-paste cocktail sign - resize 50%. move to right side of template. Add drop shadow (I used 3, -2, blur:5; color- dark gray)
-DON'T FORGET TO SAVE OFTEN!
-mirror chair and move near table
-paste backstage pass. resize 50% - free rotate 15% to the left. add dropshadow. (I used 2, -1, blur:5; color- dark gray) move to top layer (but not on top of stage lights).
-paste liquor01 - resize 50% - resize 70%. Add drop shadow (I used 1, -1, blur:5; color- black) Move layer under the layer with the cocktail shaker.
-paste ribbon01. resize 60%. Add drop shadow (I used 2, -1, blur:5; color- gray) Move to layer right above thin rectangle.
-paste cocktail03 - resize 50% 3 times.
-paste cocktail - resize 50%. Add drop shadow (I used 1, -1, blur:5; color- dark gray) duplicate, mirror.
-paste glitter swirl02. move to the layer below the bar. Mirror glitter swirl. add dropshadow to both swirls. (I used 2,-2,blur:5:color-white)
-DON'T FORGET TO SAVE OFTEN!
-paste column. move to the layer above the thin rectangles. duplicate column. mirror. add drop shadow to each. (I used 2, -2, blur:5; color - lightgray).
-paste light. move to the top layer. (above the stage lights) rotate 8% to the right. now position the light in the stage light so it looks as if the light is coming from the stage light.
-Paste stripper pole below light layer
-paste girl07. move her to the layer below the light but above the pole and stage light. add drop shadow.
Add name
SAVE
HUGS!

Subscribe to:
Post Comments (Atom)
Kim's Korner
My Stores


Blogs I visit often


My Awards

Copyright
Tutorial Sites


0 comments: